
Rock painting is a soothing activity that engages the mind in a simple yet pleasant way, and it’s a perfect bonding craft for you and your child. Explore this article to help you create a cozy cat-like rock to use as a decoration at home or in the office.
This craft is handy for teaching your little artist about color and developing hand-eye coordination. When you’re done, you can put your cat-rock in a flowerpot, outside in the garden or anywhere you need a little cuteness!

You will need:
- Two rocks (one for your child, one for you; if you have more kids, feel free to get more rocks. The process is the same.)
- White paint, black paint and orange paint
- A fine-tipped permanent marker
- Paintbrushes
Step 1: Acquire rocks. You can find rocks outside. I recommend getting river rocks if you do this because the water will have made them nice and smooth. You can also purchase rocks at most craft stores, including Michael’s.
Tip: Get a big rock to be the parent cat (your rock) and a smaller rock to be the little cat (your child’s rock).

Step 2: Ensure that your rocks are clean and dry. Set out some newspapers or a disposable tablecloth to protect your work area.
Step 3: Coat the rocks in white paint. Then let them dry.
Step 4: Apply a second coat of white paint in an even thickness across the surface of your rock. Let the paint dry as well. Rinse the brush and allow it to dry.
Tip: Always rinse your brushes with cool water. If the water is too hot, it can melt the glue holding the brush hairs in and leave little hairs stuck in your work.
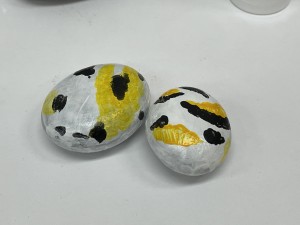
Step 5: Use orange paint to make patterned markings on your rocks. Let it dry.
Step 6: Use black paint to make another layer of patterned markings as pictured. Let this paint layer dry.
Tip: Steps 7-9 are for parents of older children. Do not leave children unattended with permanent markers.
Step 7: Draw the face. Make two upward curving lines for the eyes, a little nose shape and two curls coming from the bottom of the nose for the face. Then, add little dots and two to three crinkly lines on either side of the nose for whiskers. Draw two upside-down “V” shapes, one above each eye, for the ears. See the photo for an example.

Tip: Cat noses look like hearts, but if you’re making a very small one, make a short “v” shape.
Step 8: Draw 4 C shapes on the bottom of the rock, each facing with the curve toward the face, to create the feet.

Step 9: Draw the tail starting at the back of the rock, opposite the face, and make a spiral. Once the tail is long enough, close the spiral with a loop, as seen in the photo.

Let the permanent marker ink dry. Then decide together with your child where you’d like to place your cat-rocks.


